Welcome to the CJU website »
LOG IN

 Indexed in Index Medicus and Medline
Free Articles
HOWIDOIT
Robot assisted radical prostatectomy:
how I do it. Part II: surgical technique
Roger F. Valdivieso, MD, Pierre-Alain Hueber, MD, Kevin C. Zorn, MD
University of Montreal Hospital Center (CHUM) - Hopital St. Luc Montreal, Quebec, Canada
VALDIVIESO RF, HUEBER P-A, ZORN KC. Robot assisted radical prostatectomy: how I do it. Part II: surgical technique. Can J Urol 2013;20(6):7073-7078.
The introduction of the “da Vinci Robotic Surgical System” (Intuitive Surgical, Sunnyvale, CA, USA) has been an important step towards a minimally invasive approach to radical prostatectomy. Technologic peculiarities, such as three-dimensional vision, wristed instrumentation with seven degrees of freedom of motion, lack of tremor, a 10x-magnification and a comfortable seated position for the surgeon has added value to the procedure for the surgeon and the patient. In this article, we describe the 9 step surgical technique for robot assisted radical prostatectomy (RARP) that is currently used in our institution (University of Montreal Hospital Center (CHUM) – Hopital St-Luc). We use the four-arm da Vinci Surgical System. Our experience with RARP is now over 250 cases with the senior surgeon having performed over 1200 RARPs and we have continually refined our technique to improve patient outcomes.
Key Words: surgical techniques, robot assisted radical prostatectomy, prostate cancer
In the present article we describe the 9 step surgical technique for robot assisted radical prostatectomy (RARP) that is currently used in our institution (University of Montreal Hospital Center (CHUM) - Hopital St-Luc). We use the four-arm da Vinci Surgical System. Patient selection, preparation and positioning are described in the Part-I “How I do it” article.1 Our experience with RARP is now over 250 cases with the senior surgeon having performed over 1200 RARPs and we have continually refined our technique to improve patient outcomes.
1) Posterior dissection
In our experience, starting with the posterior dissection has several advantages. It improves the working space as the prostate is still suspended anteriorly by intact puboprostatic ligaments. This space allows for better visualization of the structures to be dissected and thereby limits the amount of traction exerted and the total amount of thermal energy delivered during the procedure. This approach also provides a safer and more reliable posterior bladder neck transection later on in the procedure. Moreover, when the surgeon has to transect through the bladder to liberate the prostate, an already dissected posterior plane is easily found. This initial step can also be used for teaching of residents and fellows. Finally, starting with the posterior dissection serves as a warm up for more difficult steps later in the procedure.
The initial surgical step begins with a direct visualization of the peritoneum overlying the bladder. The assistant is asked to provide upper anterior traction on the peritoneum using the Xomed Microfrance graspers. A curvilinear incision for access is made midway between the level of the Foley catheter impression and the anterior rectus wall. Monopolar scissors are used for incision of the peritoneum. Bipolar graspers are then used to dissect through and divide fibrovascular tissue to the desired plane. Through the dissection of the retroprostatic tissue, the vas deferens and accompanying arteries are exposed.
Division of vas deferens
The vas deferens are then divided bilaterally with bipolar control of both arteries. The monopolar scissor blade is used as a spatula to free adjoining vessels. This is done approximately 5 cm from the level of the prostate.
Exposure of the seminal vesicles
For this part of the procedure the assistant is asked to provide upper traction of the vas deferens and downward traction with the suction tip to expose the tip of the seminal vesicle. Blunt dissection of the fibrovascular tissue overlying the surface of the seminal vesicles exposes the postero-medial surface of the seminal vesicle. Then, the lateral surface of the specimen is mobilized using, again, blunt dissection. The seminal vesicle is then grasped by the bipolar instrument to help liberate the posterior avascular plane. Meticulous blunt dissection is continued to allow complete liberation of the seminal vesicle.
Deep posterior dissection is then continued to the level of Denonvillier’s fascia. One of the most important aspects of posterior first dissection is the anterior dissection to the level of the prostate of both vas deferens. This permits a safe entry into the retro-prostatic dissection during posterior bladder neck dissection.
2) Retzius space dissection and endopelvic fascia dissection
The umbilical ligaments and urachus are initially divided with the bipolar graspers. The forth arm Prograsp is used to provide traction. Care is made to achieve good hemostasis since occasionally these structures have patent vessels. The bladder is then liberated off the anterior surface of the abdominal wall. The avascular plane found is further blunt dissected to the pubic bone and the bladder is placed on stretch. The lateral attachments to the vas deferens are liberated as well.
Anterior prostatic fat (AFP) dissection
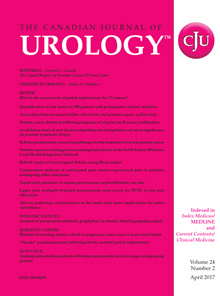
Resting on top of the anterior wall of the prostate, a layer of fat is identified. Removing this layer of fat will allow better visualization of the puboprostatic ligaments, the dorsal venous complex as well as the junction between the bladder neck and the prostate, see Figure 1. Also, Alhering et al showed that lymph nodes are found in this tissue in 11% of patients. They found that the removal of the APF and its pathologic analysis can result in pathologic upstaging.2 Consequently, this ‘flap’ of fat is dissected in a cephalad direction up to the junction of the bladder. It is then further dissected laterally towards the lateral pelvic sidewall.
At this point the anterior surface of the prostate is seen. Thereafter, all the tissues lying on top of the prostate are dissected to reveal the pubo-prostatic ligaments as well as the dorsal venous complex (DVC). Lateral dissection of the bladder is carried out down toward the crossing of the median umbilical ligament and vas deferens in order to ensure optimal mobility of the bladder and to minimize future tension at the vesicourethral anastomosis. Accessory pudendal arteries traveling longitudinally along the anteromedial aspect of the prostate are easily recognized during RARP.
3) Dorsal vein complex (DVC) ligation
A total of two suture ligations are put in place (one distal and another more proximal), see Figure 2. The distal suture provides the necessary hemostasis while the proximal suture will be used later for prostate traction. The suture (using Vicryl 1-0 polyglactin 910 with a CTX needle) is passed beneath the DVC and anterior to the urethra. Securing the DVC as far away from the prostatic apex as possible can help minimize iatrogenic entry into the prostatic apex during later division of the DVC.3 A total of four square knots are used.
4) Bladder neck transection
After identification of the proper plane of dissection, the bladder neck is divided horizontally using monopolar cauterization until the urethral catheter is identified. Precaution should be taken to ensure that the anterior bladder neck incision does not extend too laterally to avoid branches of the dorsal vein fanning over the prostate and to prevent unwanted bleeding. These veins will be controlled using Hem-o-lock clips. The Foley catheter balloon is then deflated. While external counter traction is exerted on the penile meatus via the Foley catheter by the bedside assistant, the prostate is suspended anteriorly towards the abdominal wall by grasping the internal tip of the catheter and lifting it upwards.
Thus, with upper traction on one hand by the assistant and downward traction at the level of the bladder neck with the suction tip, the posterior bladder wall is addressed. Detrusors fibers and the mucosa are taken down from the left to right direction between the jaws of the bipolar, diamond-tipped graspers. This way, the retrotrigonal fascia is exposed and it is then sharply popped through with the instruments. This will then expose the previously dissected vas deferens that lie in the midline. These structures, along with the seminal vesicles are collectively grasped, pulled through the open bladder neck and handed to the assistant for upper traction.
5) Athermal nerve sparing technique and vascular pedicle control
To achieve preservation of the neurovascular bundles, it is imperative for the surgeon to use an athermal dissection technique in the proximity of the nerve bundles but also to limit the amount of stretch, which may cause traction nerve injury.4 Dissection of the pedicle is performed using the diamond tipped bipolar instrument to isolate the pedicle of tissue to be clipped by the assistant. A medium 10 mm Weck Hem-o-lok clip is introduced by the bedside assistant, which allows for proximal control. When large veins are present, a back-lid clip can also be applied to limit amount of oozing during surgery. Once the clips have been placed, sharp scissor cutting between them helps liberate the tissue.
NVB preservation
After releasing the prostate from its vascular pedicles and completing the posterior plane dissection by dissecting through the Denonvilliers fascia to the prostate apex, the avascular plane is followed laterally along the prostatic capsule. Small stroking movements using the back end of the monopolar scissor liberate the tissues. Any perforating vessel can be cut sharply and if needed hemostasis can be achieved with short use of the single blade of the open monopolar scissors. Gentle anterograde dissection can be carried along this plane from the base to the apex of the gland. Interestingly, a recent, study by Patel et al, observed that in patients with normal preoperative erectile function, a retrograde nerve sparing approach with early apical release facilitates early recovery of potency and continence compared with an antegrade approach and this without compromising the margin status. Furthermore, they also, found that the retrograde nerve sparing technique is associated with less intraoperative blood loss.5
6) Non-nerve sparing technique
Occasionally, due to oncological related factors the surgeon may perform a wider resection away from the prostate capsule due to a high probability of extracapsular cancer. The goal of this more extensive dissection is to minimize the risk of positive surgical margins (PSM).
In order to efficiently seal tissue and vessels of the prostate pedicle, use of wider placed Hem-o-lock clips or vessel-sealing devices such as the EnSeal (Ethicon Endosurgery, Cincinatti, OH, USA) is preferred to assure hemostasis and maintain tissue integrity. Initially in our experience, bipolar cautery was used to coagulate the tissue prior to scissor division. Dissection, particularly along the apex of the gland, must be performed with caution to avoid rectal injury or laceration.
Although few data are available in the literature regarding RARP for unilateral nerve-sparing techniques, a recent consensus panel believed that these techniques can be considered for patients with unilateral extraprostatic disease. In such cases, partial preservation of the neurovascular bundles limited to the side with organ-confined disease or no disease may be indicated.4
7) Urethral division and specimen liberation
Initially, the fourth arm is used to grasp the backbleed Vicryl suture that was previously placed along with the DVC suture and place cephalad traction. The bipolar instrument is then placed beneath the DVC alongside the prostatic capsule. Monopolar scissors are used to divide through the tissue, see Figure 3. Once the DVC has been transected, attention is then drawn to urethral division. The urethra is then skeletonized to delineate the boundary of the end of the prostate and the released neurovascular bundles. Sharp scissor cutting through the anterior urethral wall allows for visualization of the Foley catheter, which is then withdrawn to expose its tip. The remaining posterior wall including the rectourethralis fibers are then cut sharply to liberate the prostate. The prostate is placed in an endo-catch bag along with the anterior prostatic fat and is placed in the upper abdominal space for later retrieval.
8) Continuous vesico-urethral anastamosis (VUA) using VLOC sutures6
The well-dissected bladder is free and mobile and can be easily descended into the pelvis. The anastamosis is done using a self-cinching unidirectional barbed suture (2 knotless, interlocked 6-inches 3-0 V-Loc-180 suture) as previously described.7 The sutures could be easily interlocked via their tail loops by the scrub nurse.
Posterior reconstruction
Posterior reconstruction helps create a posterior plate in which to buffer the anastamosis and reduce bleeding, see Figure 4. Several studies have shown that a proper posterior reconstruction reduces urinary leaks and could also help promote earlier return to pad-free continence.8,9
The left sided VLOC suture is anchored at the 5 o’clock position of the bladder neck. The cut Denonvillier’s fascia and the detrusor muscle are grasped and passed through with the needle. The suture slack is held and pulled upward using a ‘hand over hand’ technique until the part the sutures interlock are within the bladder muscle. The needle is then positioned towards the urethra and the assistant introduces the Foley catheter tip. The needle is then passed through the posterior side of the urethra at the same 5 o’clock position. The suture is pulled through until the interlocked loops abut with the tissue providing resistance, as a knot would. A second bite is then taken from the midline retrotrigonal area behind the bladder followed by a 6 o’clock bite of the periurethral tissue. Special care is made to ensure there is no cephalad traction on the bladder prior to cinching. Finally, a 7 o’clock suture is taken on the bladder-side retrotrigonal tissue again ensuring not to include any mucosa. The left arm of the interlocked V-Loc suture is then lifted cephalad and anteriorly with the left needle driver, while the open right needle driver sat on the bladder tissue to serve as a fulcrum point to avoid tissue tearing. The bladder is thus cinched down with repetitive, short pulls until the bladder neck mucosa is adjacent to the urethral stump with no gap.
Vesico-urethral anastamosis
The same left arm of the interlocked suture is used to begin the vesico-urethral anastamosis. An initial transmural inside-out bite of the bladder is made at the 6 o’clock position, followed by a bite of the posterior urethra. Depending on the size of the bladder neck the surgeon may take larger tissue bites to parachute down for the bladder neck – urethral stump discrepancy.
The assistant reintroduces the tip of the Foley catheter to ensure the grasp of the correct tissues. The ‘outside-in’ bites along the bladder and the inside-out urethral bites are continued from 6- to 10-o’clock, each time cinching the tissue with the right needle driver straddling the suture to avoid urethral tearing. Rather than completing the left side of the VUA and obscuring the posterior anastamosis, the right arm of the V-LOC stitch is used to complete a synchronous process starting from an outside-in 5- o’clock bladder bite to a 5-o’clock ‘inside-out’ urethral throw. Repetitious passes are continued for the entire right side 5- to 12-o’clock with final pass, each time, independently assuring adequate tension.
The right arm is finally brought through the anterior urethral side and cut with a 2 cm to 3 cm stump. The left wall is then completed in a running fashion from the 10- to 12-o’clock location again finishing on the anterior urethra. Prior to cutting the left arm V-Loc suture, the integrity of the VUA is verified with 300 cc normal saline instilled in the bladder. The needles can be snapped out and removed from the body by the assistant.
9) Case completion and postoperative considerations
Prior to undocking the robot and removal of the specimens, the pelvis and operative field are carefully reinspected for bleeding under low insufflation pressure (< 10 mm Hg). The bowel is equally examined closely to make certain that there is no injury resulting from instrument exchanges. Then, the string for the laparoscopic entrapment sack is transferred to the camera port site at the umbilicus and the abdomen is completely deflated. The specimens within the laparoscopic entrapment sack are extracted intact through extension of the periumbilical trocar site (usually 2.5 cm to 3.5 cm in length). The fascial defect is then immediately closed by 0-Vicryl sutures. The skin defects are then closed with a subcuticular absorbable suture (4-0 Monocryl) followed by the skin adhesive Dermabond (Ethicon, Cincinatti, OH, USA). Closure of the fascial defect for the 5 mm and 12 mm trocar sites are not necessary.
Once extubated, the patient is then transferred to the recovery room where vital signs, in/outs are taken as usual for postop patients. Regular diet is offered the evening of the surgery and patients are mobilized out of bed within hours of surgery. Over 95% of our patients are discharged within 24 hours of surgery with planned removal of the Foley catheter on postoperative day 4. Patients are educated on how to take care of the catheter and it is left in place to a leg-bag upon discharge. A trained nurse then removes the catheter during an outpatient appointment. An initial follow up visit is scheduled 4-6 weeks after surgery to review recovery and the result of the final pathology on the surgical specimen Serum PSA is obtained at 3, 6 and 12 months following RARP with subsequent serum assessments depending on the pathological stage, grade and margin status.
Accepted for publication September 2013
Address correspondence to Dr. Kevin C. Zorn, University of Montreal Health Center (CHUM), 235, boul. René-Levesque Est, suite 301, Montreal, QC H2X 1N8 Canada
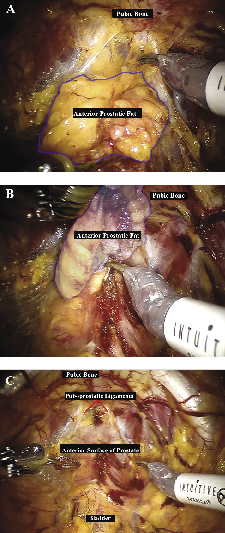
Figure 1. Anterior prostatic fat dissection. A. Anterior prostatic fat (APF) overlying the dorsal venous complex, the anterior surface of the prostate and the prostato-vesical junction. B. En bloc dissection of the APF extended cephalad to the prostato-vesical junction and laterally toward the lateral pelvic sidewall. C. Anterior prostatic surface exposed after APF dissection.
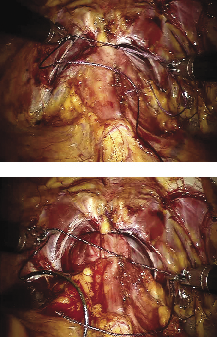
Figure 2. Dorsal venous complex ligation. A. Distal ligation of the dorsal venous complex (DVC) using a Vicryl 1-0 suture. The suture is passed beneath the DVC and anterior to the urethra as far from the prostatic apex as possible. B. Proximal ligation of the DVC. This suture is placed to allow cephalad traction while transecting the DVC later in the procedure.

Figure 3. Dorsal venous complex (DVC) transection. The fourth arm grasper provides cephalad traction on the backbleed Vicryl suture that was placed proximally while the monopolar scissors divide the DVC.
Figure 4. Posterior reconstruction. A. The VLOC suture is passed through the bladder-side retrotrigonal area at the 5, 6 and 7 o’clock position and through the periurethral rectourethralis muscle. B. Traction is used on the VLOC suture to cinch down the bladder until its mucosa is adjacent to the urethral stump and no gap is left.
1. Valdivieso RF, Hueber PA, Zorn KC. Robot assisted radical prostatectomy: how I do it. Part I: patient preparation and positioning. Can J Urol 2013;20(5):6957-6961.
2. Finley DS, Deane L, Rodriguez E et al. Anatomic excision of anterior prostatic fat at radical prostatectomy: implications for pathologic upstaging. Urology 2007;70(5):1000-1003.
3. Talug C, Josephson DY, Ruel NH, Lau C, Kawachi MH, Wilson TG. Controlling the dorsal venous complex during robotic prostatectomy. Can J Urol 2012;19(1):6147-6154.
4. Montorsi F, Wilson TG, Rosen RC et al. Best practices in robot-assisted radical prostatectomy: recommendations of the Pasadena Consensus Panel. Eur Urol 2012;62(3):368-381.
5. Patel VR, Schatloff O, Chauhan S et al. The role of the prostatic vasculature as a landmark for nerve sparing during robot-assisted radical prostatectomy. Eur Urol 2012;61(3):571-576.
6. Zorn KC, Widmer H, Lattouf JB et al. Novel method of knotless vesicourethral anastomosis during robot-assisted radical prostatectomy: feasibility study and early outcomes in 30 patients using the interlocked barbed unidirectional V-LOC180 suture. Can Urol Assoc J 2011;5(3):188-194.
7. Zorn KC, Trinh QD, Jeldres C et al. Prospective randomized trial of barbed polyglyconate suture to facilitate vesico-urethral anastomosis during robot-assisted radical prostatectomy: time reduction and cost benefit. BJU Int 2012;109(10):1526-1532.
8. Rocco F, Carmignani L, Acquati P et al. Restoration of posterior aspect of rhabdosphincter shortens continence time after radical retropubic prostatectomy. J Urol 2006;175(6):2201-2206.
9. Gautam G, Rocco B, Patel VR, Zorn KC. Posterior rhabdosphincter reconstruction during robot-assisted radical prostatectomy: critical analysis of techniques and outcomes. Urology 2010;76(3):734-741.
Current Issue
December 2024, Vol.31 No.6